In addition to the Eyecon software, you need a video camera. Maybe you already have a video device installed in your computer. Here are some remarks on the usability of this cameras and video devices in respect to EyeCon.
Digital Cameras
So called "webcam" cameras offer a simple and affordable solution since they do not require any addition hardware or adapters. They are usually connected via the computers USB port. Webcams tend not to have the picture quality of a normal video camera. This may and may not be a factor: it really depends on what you want to do with the system. If the camera is far away from the stage (such as in a big theater), or if the lighting is not very good (low level, low contrast), then you may run into trouble. We recommend USB webcams for tryout and experimenting. The Philips webcams are known for the high picture quality and light sensitivity.
Newer DV digital cameras generally have a firewire (IEEE1394) output and you might have a firewire connector on your notebook or desktop PC. DV cameras obviously have excellent picture quality. Their drawback is that they always use full TV resolution resulting in a high data rate and perceivable latency when capturing data with Eyecon. Also, some cheaper models don't allow you to turn off the autofocus or automatic aperture (Eyecon would interpret such camera setting changes as "motion" resulting in elements being mistakenly triggered). We can't really recommend the use of DV digital cameras with EyeCon.
Analog Cameras
The standard video camera today outputs an analog video signal. For Eyecon's purposes, the quality of these cameras is almost always adaquate . Black and white cameras generally have more-than-sufficient picture resolution (and indeed, often have less video noise than color cameras). Analog cameras are the recommended solution for flexible stage use, cables can be as long as 100m, you can select the appropriate lens for your needs and professional clamps are available.
They do, however, require some additional hardware to get their image into the computer (most computers do not come with a video-input capability).
Analog to Digital Converters
There are three possibilities: One is to install a video-input board into your computers PCI slot. The installation is easy, and this solution has the advantage that you can attach multiple cameras to your computer. Many so called TV-cards work with EyeCon.
Another option is to use a video-to-USB adapter unit (available from us) and then simply use the USB jack of your computer. With the USB solution you may experience a perceivable latency (less than 100ms) between the time when a person moves, and the time when the media is triggered.
There also adapter units for the computers firewire connector. The consumer versions (DV-Bridge and similar) have the same drawbacks we described for the DV cameras. They usually only convert full TV resolution resulting in a high data rate and long latency when capturing data with Eyecon. The latency is even worse than with the USB solutions. (Special drivers (Canopus) can minimize that problem.)
There's a special analog to firewire converter box available that doesn't have the described drawbacks. It's special industrial equipment and transmits the video data fast and without compression. This is the best solution for analog to digital conversion for firewire (and notebook computers) we know off. It's relatively high-prized.
There are two generations of windows drivers for video devices. The newer version is the 'WDM' driver (Windows Driver Model). This is the one you should check for. EyeCon also supports the older 'VfW' drivers (Video for Windows) but performance and setup possibilities are very limited.
In case you are using an older video device (the analog video editing board you installed years ago...) please check wether you find 'WDM' drivers for your board from the manufactorers website.
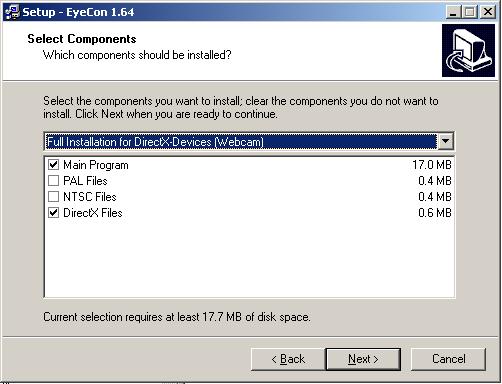
Please make sure you select the right option during installation of EyeCon for DirectX-video support
After installation run the EyeCon program for the first time. First you get a selection box where you can choose between the installed video devices:
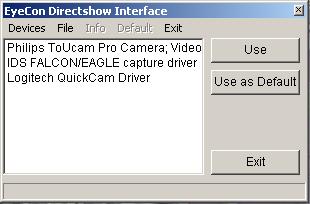
Select the video device you want to use. If you want to get the selection box everytime you start EyeCon, select 'Use' to proceed. If you always want to work with that specific video device, select 'Use as Default'. When you start EyeCon the next time, it's loading that driver without asking you again. You can later disable the default setting in the video setup menu.
For testing you can also select an AVI-file from the file menu. It depends on the the codec and compression of the video file, whether you can use this option. Not all files might work.
Now the program main screen should come on and you should see a video picture in the video window.
First check your video settings. Go to menu Options-Videopara to setup your device. It depends on the video device how this menu will look. You can usually setup brightness and contrast and different other parameters.
For your start with EyeCon you should turn down the color saturation to 0 or turn off colors with the checkbox (if available) . This will result in better overall picture quality.
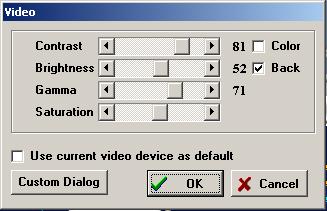
The checkbox 'use current video device as default' allows to select whether you are asked for selection of a video device after program start or the current device is used as default.
Also check the custom dialog for you video device. It looks different for each individual video device.
Here you see the custom dialog for the Philips ToUCam 740K.
Usually you should turn off all automatic settings, set a high framerate and switch to black and white. Not all options are always available. Sometimes the settings interfere between the main video setup and the custom settings. It just depends on the driver.
EyeCon Help, this file last changed on 16. Aprilt 2003